

Articles / Spherical 360 Video, Test Shooting
10.10.2011
This article was not written as an ordinary manual for spherical videos shooting but as a story of our experiments on this issue including all the mistakes made, even curious ones, and lyrical digressions.
360 Video. History of Creation
Back nearly 10 years ago when a wide range of users could afford the first digital cameras, the idea of spherical shot was as virtual as the virtual reality itself. A breakthrough was achieved in the latest 5-6 years. Since then the spherical panoramas have composed a genre: a viewer along with the panoramic photographers can fly up in the sky, dive into a deep ocean, visit the farthest corners of our planet and even be cooked together with the eggs in the oven. The feelings of a real existence in the point of shooting, which spherical panorama offers, incomparably exceed the richest and high professional traditional photo and video. In comparison with the achievements in the sphere of surrounding space visualization the traditional genres lost drastically.
Along with technologies were developing the most progressive panoramic photographers began to concern with the question of shooting not only static spheres, when a viewer stands in a fixed shooting point, but also unsteady ones, when the viewer is able to move in space and look different sides. That time it seemed fantastic!
Nevertheless, the progress was moving ahead and fantastic things became reality.
One of the first spherical videos was represented by the Immersive Media Company www.immersivemedia.com
Several years ago by chance we saw the interactive video reportage by Immersive Media on the site of CNN. It was dedicated to the consequences of the earthquake on Haiti, which had almost completely destroyed its capital:
http://www.cnn.com/interactive/2010/01/world/haiti.360/index.html (there are 5 videos)
The video impressed us very much: in spite of low resolution the viewers can virtually visit the place of the tragedy.
In spring of 2011 when we was interested in shooting of 360 video and contacted Immersive Media with a query of prices and equipment. But Immersive Media proposal shocked us: 63 thousand dollars for camera and correspondent equipment with a delivery term of several months. We were puzzled…
Despite the high price for the equipment we didn’t like the characteristics of video; they were low and weak in comparison with the actual ones. We analyzed the shots of Haiti’s video and concluded that the shot’s dimension was 1792x896 pixels; the bitrate was 1600 Kbit/sec with the frame frequency of 15 shots/sec.
It is worth to mention that by that time we have already had great experience in spherical panoramas shooting and have been able to realize such things which can be made by a few people in the world: shooting in the air either from helicopter, light jet or big balloon; shooting with a radio-controlled model and underwater spheres shooting. Now there are virtual tours shot in about 350 interesting places of the Earth on the site of AirPano.com. From the technical point of view, some of our creative works are the unique ones. For example, we shot the spherical panorama at a speed of 250 kilometers per hour flying on the board of one of the helicopters in group, we made a giga pixel panorama in the air at a height of 1 km and, finally, we learnt to shoot night aerial spherical panoramas. Besides panoramas shooting, we have had experience in video editing of approximately “upper intermediate” level.
Well, that time we refused the idea of the purchase from Immersive Media and decided to try creating a spherical video by ourselves using already available photo equipment.
Start. First Obstacles
It was decided that the role of video camera would be played by Canon 5D Mark II which allows shooting in Full HD format 1080p. With the help of Canon we hoped to obtain a wider dynamic range that it was in the video reel with Haiti, which had been shot with matrixes used in not expensive simple hand-held cameras. As a lens we used Sigma 10mm fisheye with the lens hood cut. We often use such lens in our ordinary shootings. The process of cutting itself, when Andrey Zubets cuts a lens hood from the lens with a hacksaw in the kitchen, looks like that:
No doubt, the lens doesn’t look new in that case but it allows making spherical panoramas with 3 shots.
Our plan of “360 video” creating was the following: shoot an ordinary video with three cameras simultaneously, then cut the video for the separate shots, stitch the spherical panoramas using those shots and, finally, create the video using the 360 degrees panoramas. As you see, it is easy :)
But to realize that easy plan into real life wasn’t so easy because we met a number of obstacles, which sometimes were just insuperable. Our brain storming lasted about a week, the next week we made experiments with shooting and processing of the material shot, two weeks later our first test video reel appeared on the site and 10 later minutes the server failed. Then we’ll tell you how we were overcoming obstacles and what happened in result.
The first obstacle was a format of video shot. The proportions of a traditional photo shot are 4:3 and the proportions of a video shot are 16:9.
To understand better there is an illustration. Here it is the photo shot in video mode. The red zone is an area of photo shot, which is not used in video shooting and is cut by the camera.
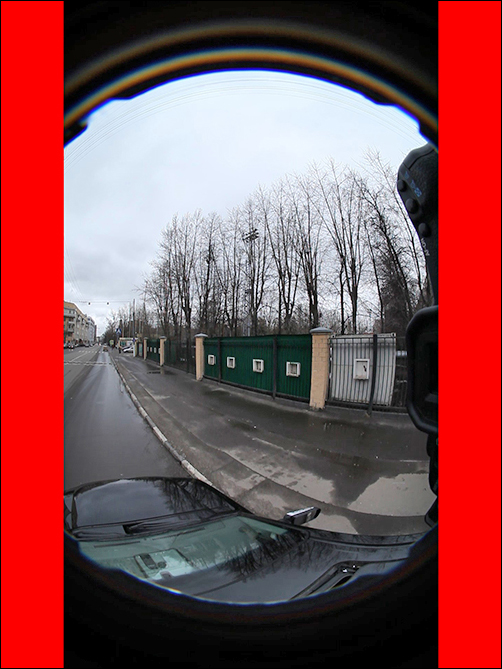
Therefore, it became clear to us that it was impossible to stitch a sphere using 3 video shots, like we wished, because of an overlapping lack. And it was the simplest problem. So, we had to use not three but four cameras and 4 objectives respectively. Fortunately, AirPano has sufficient equipment ;)
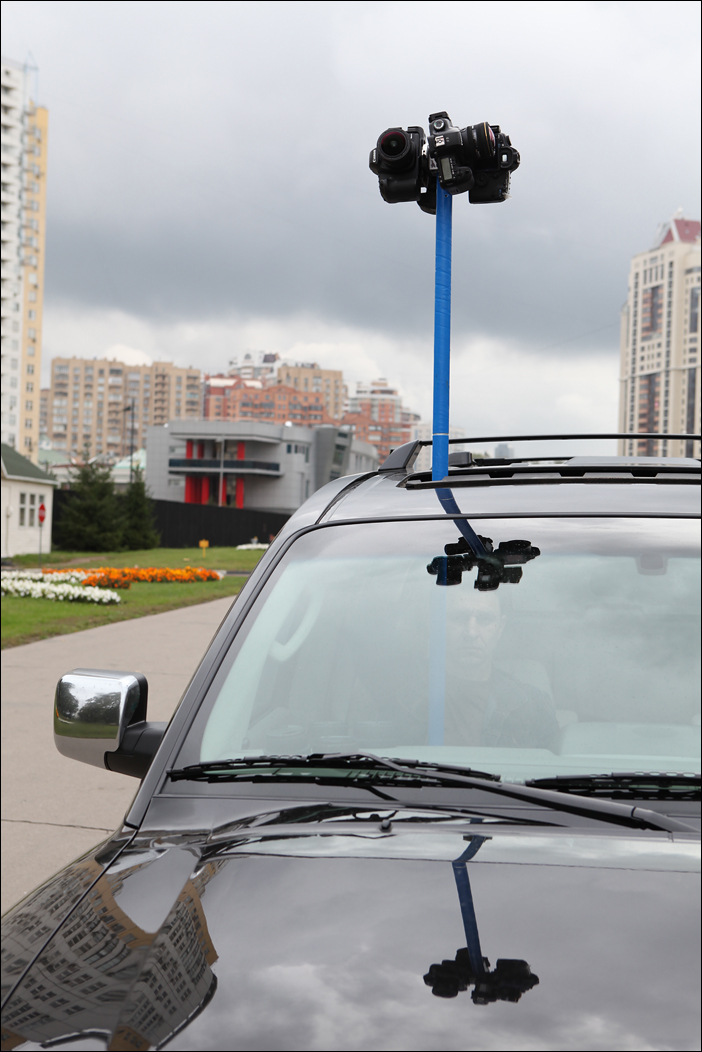
Such device was made to fix the cameras:
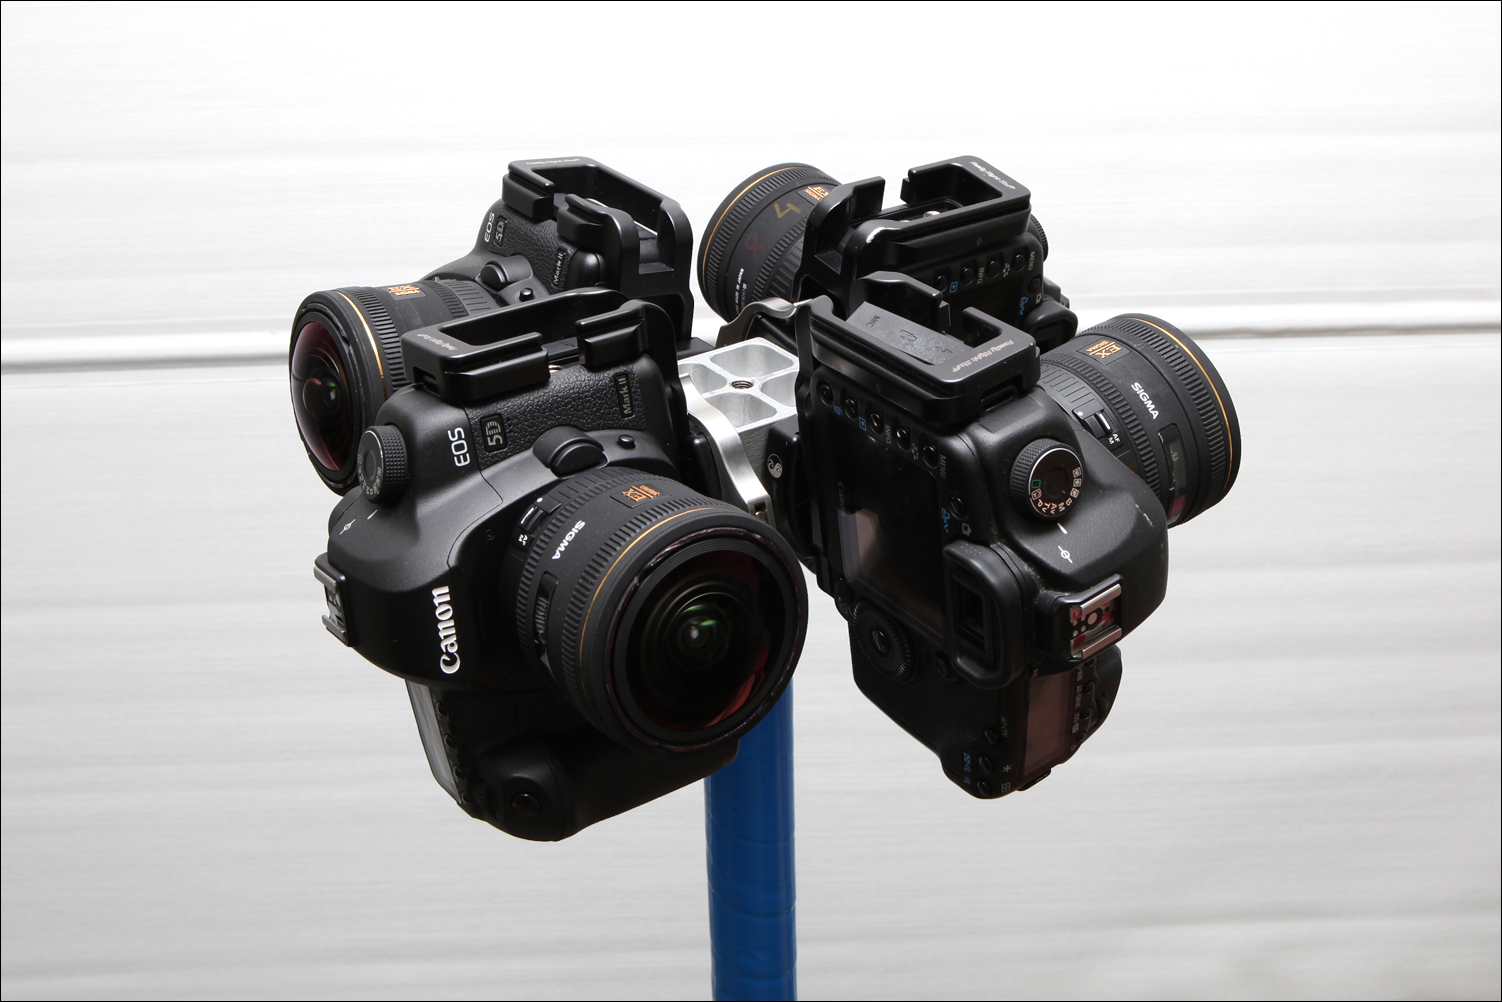
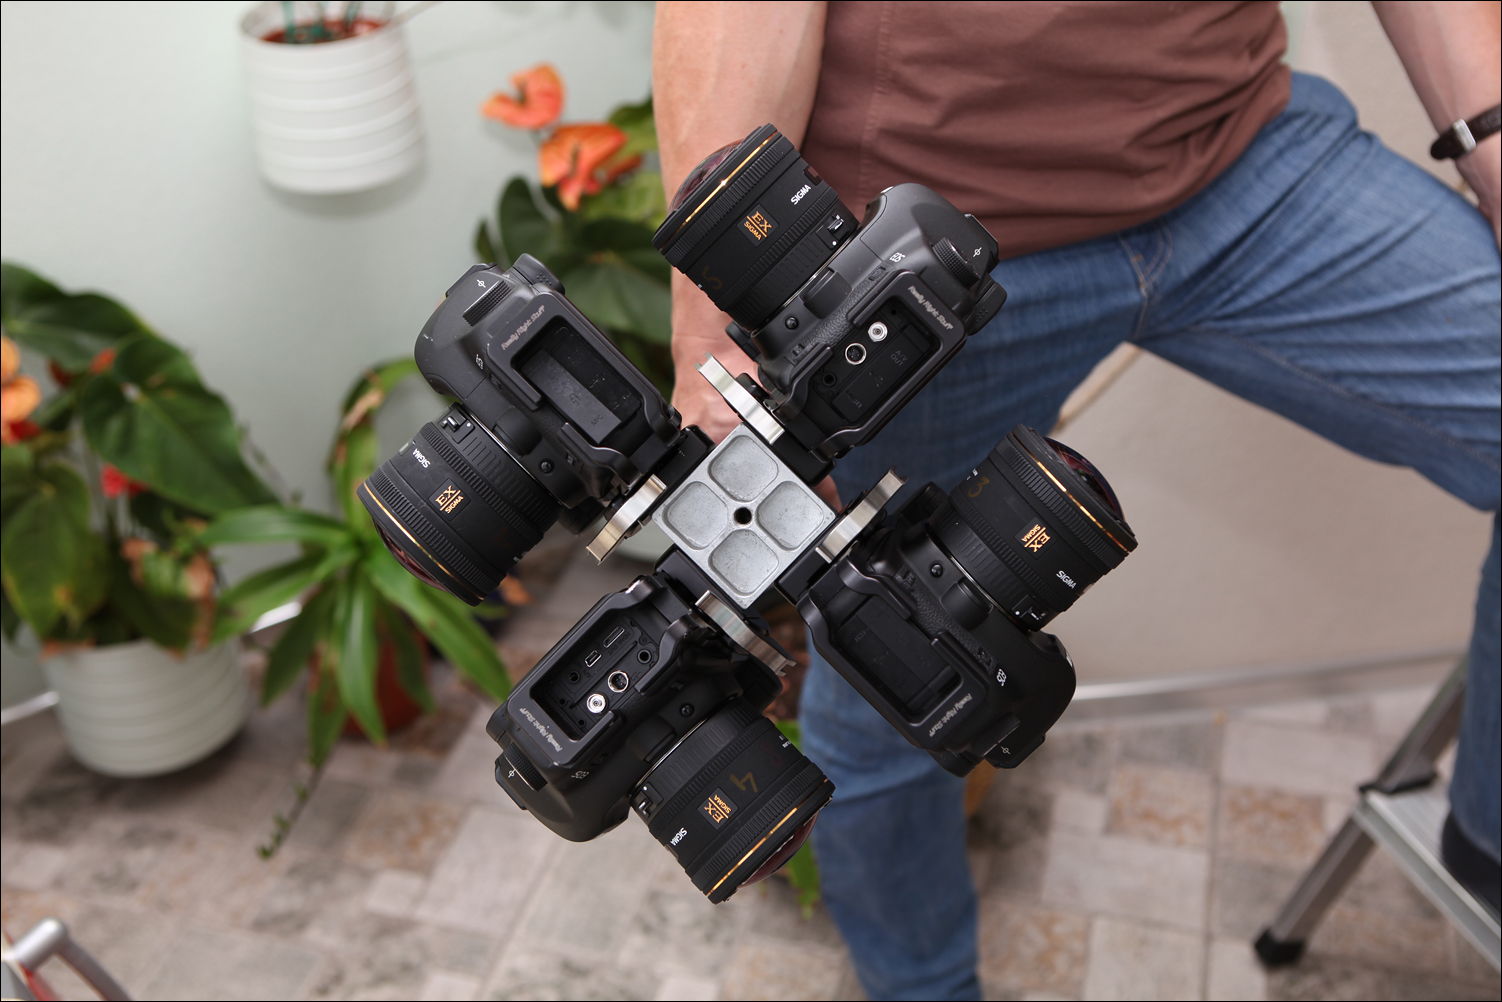
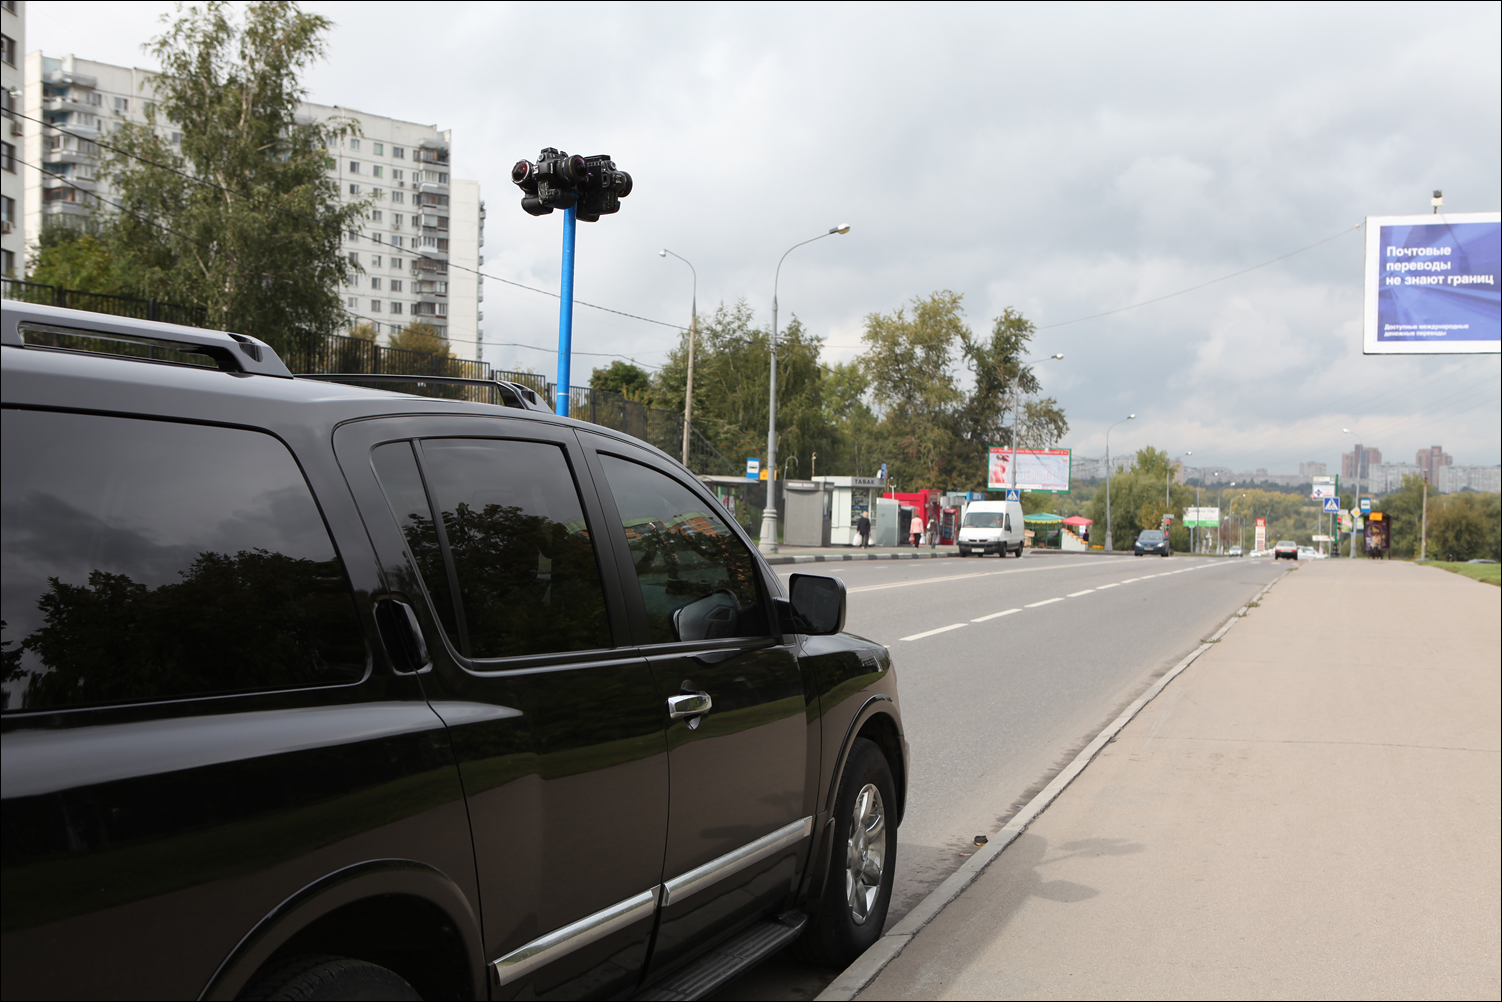
In order to minimize the parallax we put the cameras as closer to each other as it was possible. Moreover, we applied a slight slope of the cameras by 15 degrees higher the slope level that ensured the best overlapping in zenith. We had to sacrifice the nadir (the panorama’s bottom) because there were cameras below anyway. Unfortunately, it is impossible to avoid the parallax completely due to large size of cameras and huge distance between lenses. It is seen in the lower part of the video and the distortions on the car, which we were shooting from, show that. The problem with the parallax can be solved if there is no need to shoot a foreground at a short distance, for instance, from a helicopter or if the small simple hand-held cameras are used instead the huge reflex ones.
Passing through that stage in order to minimize the parallax we seriously thought of changing professional cameras (Canon 5D Mark2) into smaller digital simple hand-held cameras. We chose GoPro camera , from all the simple hand-held cameras supplied on the market because it has fisheye with a 170-degree viewing angle in its standard packaging arrangement. We bought GoPro and made some experiments. We understood that from 4-5 such simple cameras it was possible to gather a compact construction for 360 video shooting. Besides, it could be cheaper – about $2250 ($450*5). And it could be even cheaper $1300 ($259*5) buying the cameras abroad.
It is necessary to mention one more advantage of the simple hand-held cameras – small size and weight of all the construction.
However, this does not solve the main problem, which is simultaneous shooting of all the cameras together (it will be described a bit further).
At the same time, besides the significant image quality losses it is impossible to set equal exposure and white balance for all the cameras. So, having partly resolved the parallax problem, we will face the problem with different brightness at separate parts of our video (it will be observed later too).
But for an amateur shooting the quality of material shot with the simple hand-held cameras will be sufficient enough. That is why many popular producers of ready devices for 360 video use the matrixes of the simple hand-held cameras for their constructions implementing synchronization and simultaneous exposure control on all the matrixes.
Nevertheless, having analyzed all the advantages and disadvantages as well as taking in consideration that we had already had the reflex cameras and objectives otherwise we had to by the simple hand-held cameras, finally, we decided to refuse using the simple cameras for a while and to try shooting our test video with the reflex ones. All the techniques and methods described in our articles are absolutely useful for the simple hand-held cameras. And if somebody wants to gather 360 video device, we would recommend starting exactly with the simple ones due to their price, weight and size.
The next problem we faced was the synchronization of the cameras. All 4 cameras must record synchronously, i.e. simultaneously each shot. Unfortunately, Canon 5D Mark II doesn’t allow turning on the video record on all the cameras synchronously. It can be done only manually with a SET button. To output the turn on signal of recorder to an external device and, therefore, simultaneously start the record on all 4 cameras, it is necessary to disassemble the cameras and solder the wires to this button. By the reasons, which everyone can understand well, we didn’t dare to do that then and began to search for the alternative ways.
Among Canon’s accessories we found Wireless File Transmitter WFT-E4 II A. It was said in the description that it could be used when it was necessary to shoot with 10 cameras simultaneously. But it was still not clear for us if it was suitable to record a video.
We tried to send a query to Canon USA but failed because the site of Canon USA accepted only the queries of US citizens. That was the first time we faced the policy of double standards. Fortunately, we know a photographer from Dallas who helped us and sent the query to Canon. The next day he forwarded the reply: “Dear customer, it is not possible to turn on a video recording this way. Thank you for interest in our products”.
Then we were searching for an alternative hacker firmware for Canon, which could be useful for us, but we failed again.
Our friends helped us to contact Moscow Representative Office of Canon. They understood us quickly. We were told that Canon produced professional video cameras with GenLock and V-lock systems GenLock и V-lock (http://en.wikipedia.org/wiki/Frame_synchronizer). But Canon 5D Mark2 does not contain them.
Then they offered to solder the wires to the SET button and output them to an external device. We have nearly dared to disassemble the first camera, but refused by the following reasons. Even if we solder all the SET buttons of 4 cameras, Canon does not regulate the record start parameter since the moment of pressing the Record button. It is not evident that the record start parameter is stable or equal in each camera. It is probable that it is variate and 4 cameras will be disassembled in vain and as a result just will be destroyed.
The problem was solved easily. When we were complaining of our hard life to the colleague Stas Sedov, he was surprised by this simple question and asked: “How do they realize it when shooting a film? It is done with a clapper, which allows synchronizing with a sound.
It changed everything.
First, we bought a dogscarer with volume level of 130db. Its sound was so loud that we suffered because felt ache in the ears, at the same time, it was good in a loud helicopter. However, we found out that a rapid impulse with a sharp front was required and the dogscarer was absolutely not suitable. But a clap of hands seemed to be perfectly suitable.
So, all the cameras are turned on for the recording, then a loud clap of hands is made as an analog of a clapper – that’s all and the simultaneous start of video is marked! That was an elegant decision, but, unfortunately, partial. The clapper didn’t solve another serious problem – phasing of a shot’s beginning in the cameras. The sound allows phasing the cameras discretely, i.e. only with the accuracy of one shot. When the shooting frequency is 15 shots/sec, the error will be 1/15 sec. When the shooting frequency is 30 shots/sec, therefore, the error will be 1/30 sec. To understand this better, please, see the picture below.
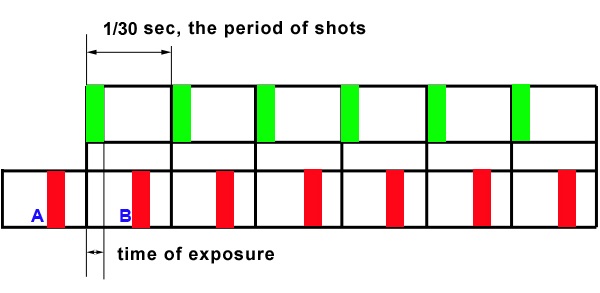
Let’s analyze the functioning of two cameras (There were four in reality). It is supposed that the shooting is made with the frequency of 30 shots/sec. In the upper row the green sectors symbolize the exposure time period of the first camera. In the second row the red sectors symbolize the same for the second one. As the cameras are managed manually, then the exposure time period varies by a random quantity. When there is a shots editing, we can discretely choose the point of cut – by the shooting frequency. It means that in order to adjust the camera with the red sectors to the green sector we must choose the red shot A or B but they both don’t match with a green shot. In any case there is a time difference in shooting of each camera. This measure is absolutely random and lies in time period, which is equal to a shot’s duration.
For static images that parameter doesn’t matter if the camera is fixed. For the full exactness, it almost doesn’t matter till a moving object pass across the border of the zone where neighbor shots cross. In that case when the object is moving fast it will be “cut” and a “step” will appear on it.
In case of spherical shooting the movement causes more serious problems. If the camera is not fixed or there is a slope, the viewing angle of the cameras, shooting neighbor shots, can be changed so much in 1/15 sec that the border between the shots becomes visible enough. The only decision of the problem is a strict synchronization of the shooting phase. Professional equipment supposes external synchronization - V-Lock (field sweep) or Gen-Lock (field sweep and interlacing). Using a special slot, the external generator is switched on (one of the cameras may substitute it and become the main one) and all the cameras shoot “shot in shot, line in line”. The problem is almost insoluble at amateur level. And we just accepted that situation.
Shooting
Before the shooting we pasted the bayonets of all 4 cameras over with a paper scotch tape in order to avoid road dust in the matrixes through the bayonets during the movement. We planned to shoot video from a helicopter and wanted to check the system’s functioning at a speed of 100-120 km/hour. There is no need to do this at a low speed. 4 cameras wrapped with the scotch tape and put out on the pole trough the hatch of the car looked very curious.
It is necessary to turn off all the automatic functions (exposure, white balance, etc) and shoot manually to obtain stable video after stitching the material from all 4 cameras. And another trouble was waiting for us there, but it was curious because the reasons, which had caused it, were hidden in no intuitive menu of Canon’s cameras as well as in not proper written manuals for them. We made several test shootings and every time we saw that from time to time the brightness of our video shots differed. First, we thought that it was by occasion when the wheel of control panel on one of the cameras had spun during we were putting the construction into the car trough the hatch. Then we thought the cameras themselves are different, from different lots. On the third day (every shooting together with processing took the entire day) we concluded that the manual mode just didn’t function but we had set it for sure. And when the sun was in the objective of one of the cameras, the camera automatically made the shot darker a bit. If the car turned aside, the brightness was restored again.
When it became clear to us, the puzzle was solved quickly.
When there is a photo shooting, in order to fix the parameters of exposure it is necessary to set Manual (M) mode having turned the wheel of the mode settings in position M on the frame. We found out that in the mode of video shooting the camera ignored manual mode till someone would turn it on, having found it in the depths of no intuitive and illogical menu list. It is not in accordance with the official manual of the producer and seems to be a disadvantage in Canon’s firmware.
The Manual mode for video shooting is not turned on by spinning the wheel on the frame of the camera but like that:
Menu - Live View/Movie func. set. -> LV func. setting - Stills+movie -> Screen settings - Movie display
Before the final shooting, I don’t know how and why, but we just forgot to set Manual mode in one of the cameras and, as we had already tested 4 days, we decided not to reshoot our first video reel - Round Kremlin - and any attentive viewer can see that sometimes the brightness is changing in different parts of the video.
In order to make easier the following material processing the stickers A, B, C and D were attached to the cameras. In the same way the cameras’ flash cards were marked. The shooting began in the following sequence:
1. Set the exposure in manual mode, which is equal for all the cameras (equal ISO, diaphragm, exposure, white balance). Besides, equal presets (image style) JPG inside the camera (they affect the video too). Focus on infinity through Live View (auto focus on fisheye functions unstably), then block the focus; fix the focus ring with a scotch tape not to turn it occasionally.
2. Transfer all the cameras in Live View mode.
3. In the camera’s menu choose Manual mode for the video shooting as it was described above.
| Make sure and check that the following icon has been set in the menu: |
4. Turn on the recording mode on cameras А, В, C and D in turns. The shooting has begun.
5. Clap your hands loudly. That sound is the sound of our film clapper. It will be a sign for the alignment of the reels from all the cameras.
6. Put the cameras out trough the hatch of the car and start the movement.
Watch the timer because the maximum time period for the record is 12 minutes. It is defined by the file system of the camera’s flash card and a file size can’t be more than 4Gb.
So, having used those methods, in April 2011 we shot several test videos moving in the car as well as flying on board of a helicopter over MEH.
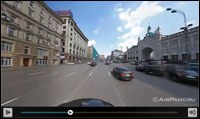
- Shooting from the Car Video:
- Shooting from the Helicopter Video:
Processing of Material
To feel free in processing of a 360-video material the powerful computers are needed.
On the stage of the methods elaboration we used once well-known Intel Core 2 Duo 3.3 GHz, 8 GB RAM, RAID0 2xRaptor HDD for the processing.
The panoramas for the video reels were stitched for 2-3 hours with such computer and that, surely, was slowing down much the process itself. We remembered the times when we used to be the students and while Windows 3.1 was downloading we were drinking tea.
That is why we changed it and chose more powerful computer with Intel Core i7 Extreme Edition 3.3 GHz processor, 24 GB RAM, SSD storage device PCI-E 480Gb OCZ RevoDrive X2 Series SSD. It helped to reduce the processing time drastically, several times. And the processing took us not more than 20 minutes! Especially I would like to mention the proper functioning of SSD HDD if there are arrays of the small files. In such case the access speed is a key factor. We had nothing to do but to leave the cup of tea full half on the table using such powerful computer :)
Division of Video into Separate Shots
So, in our disposal we had the video reels simultaneously shot with 4 different cameras having the sound marks of the shooting start.
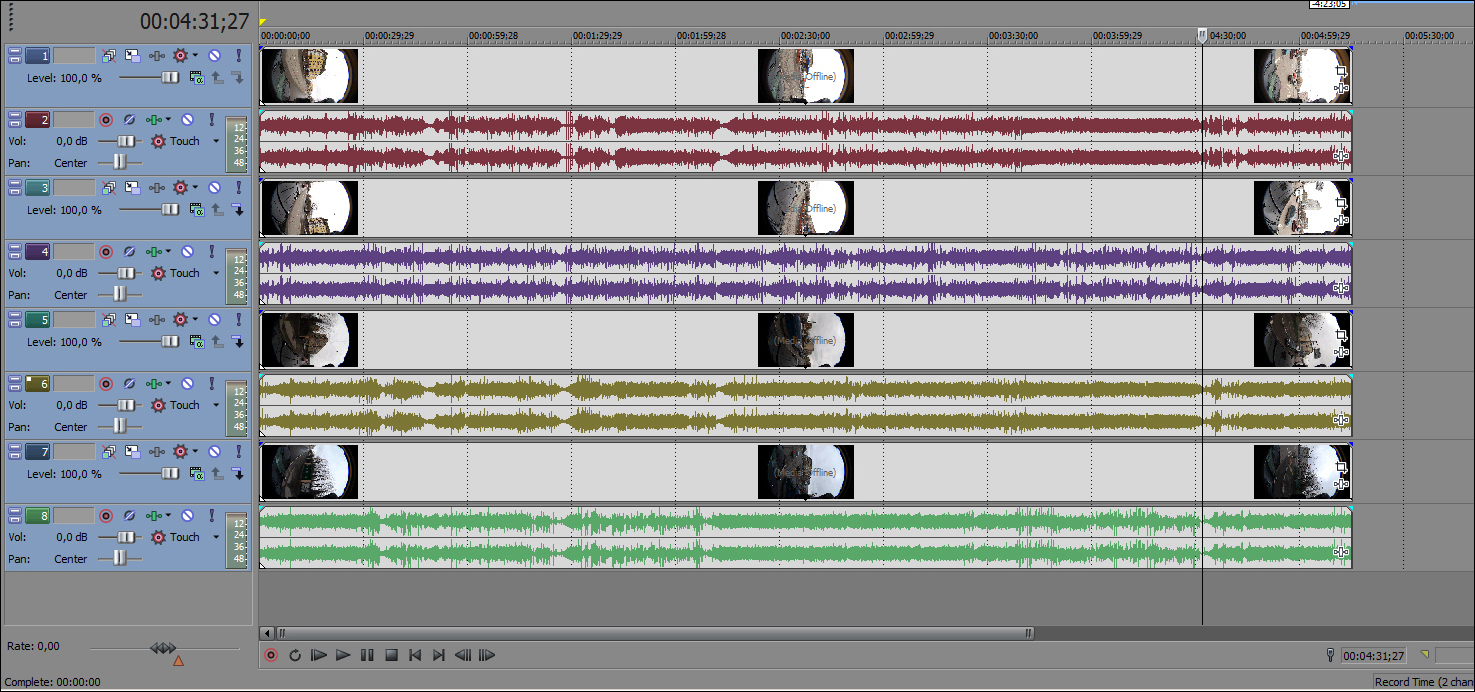
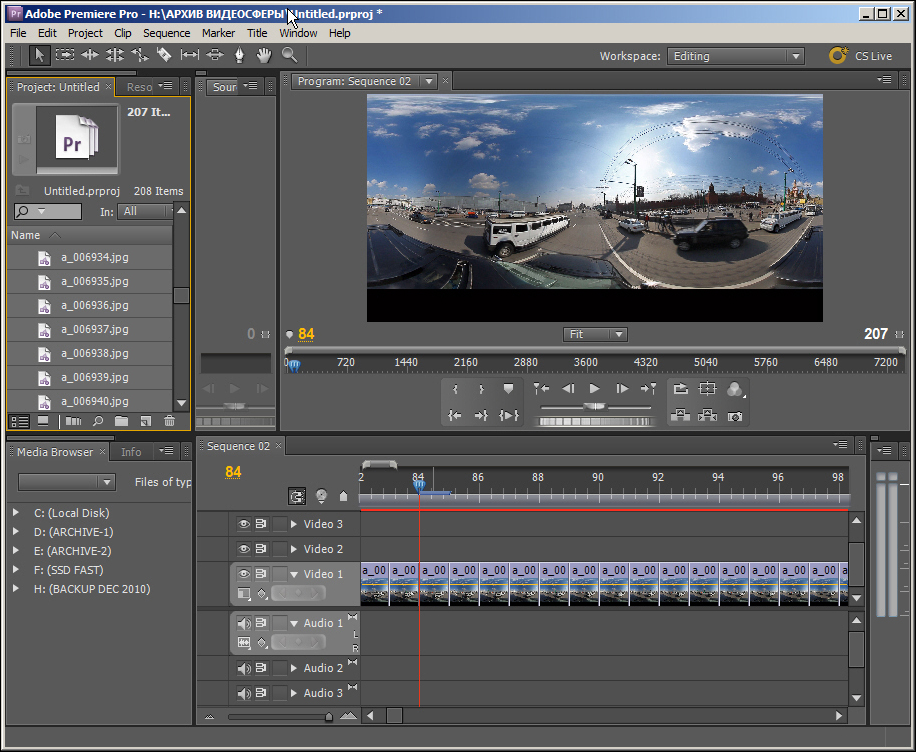
How can we obtain a spherical video from that material? We began to divide all the videos into separate shots. All four video sreels were simultaneously opened in Sony Vegas video-editor.
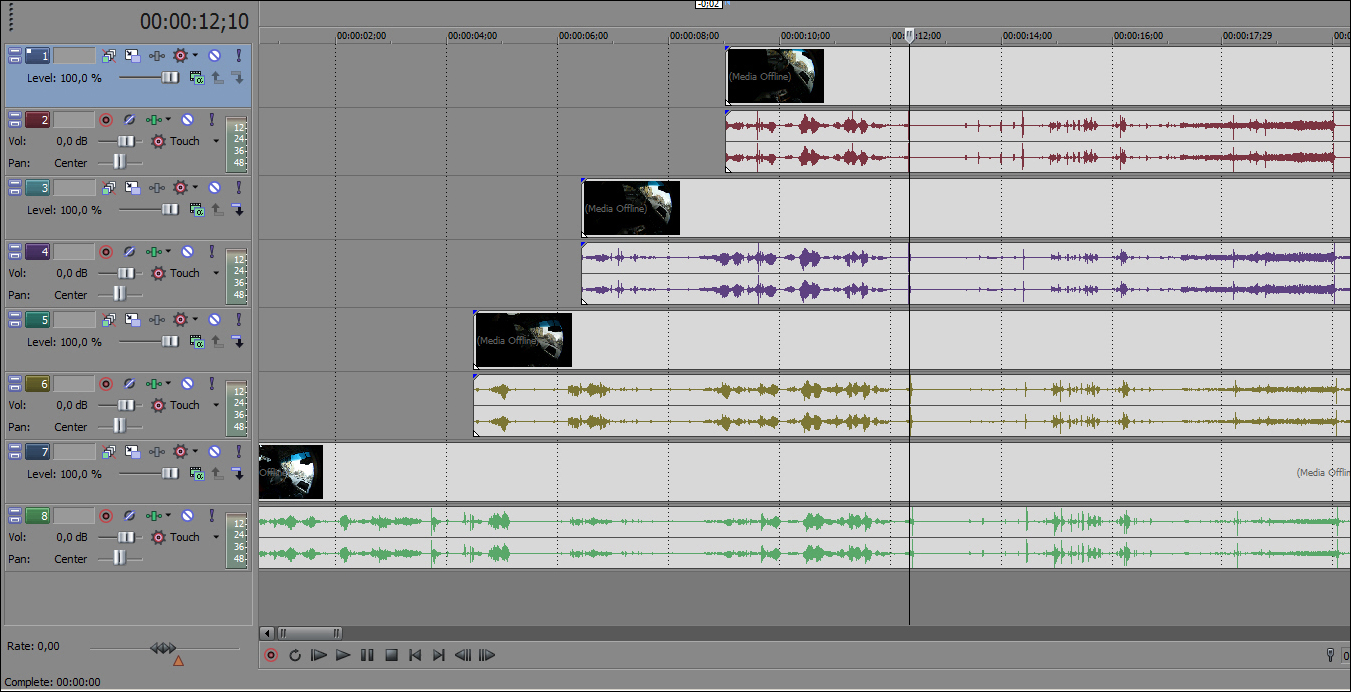
As it is seen from the screenshot above all the reels are equalized with a surge (a clap of hands) on the sound track. Making cut in the place marked with the clap, we have quasisynchronized the video tracks. The time synchronization is realized with the exactness up to one shot.
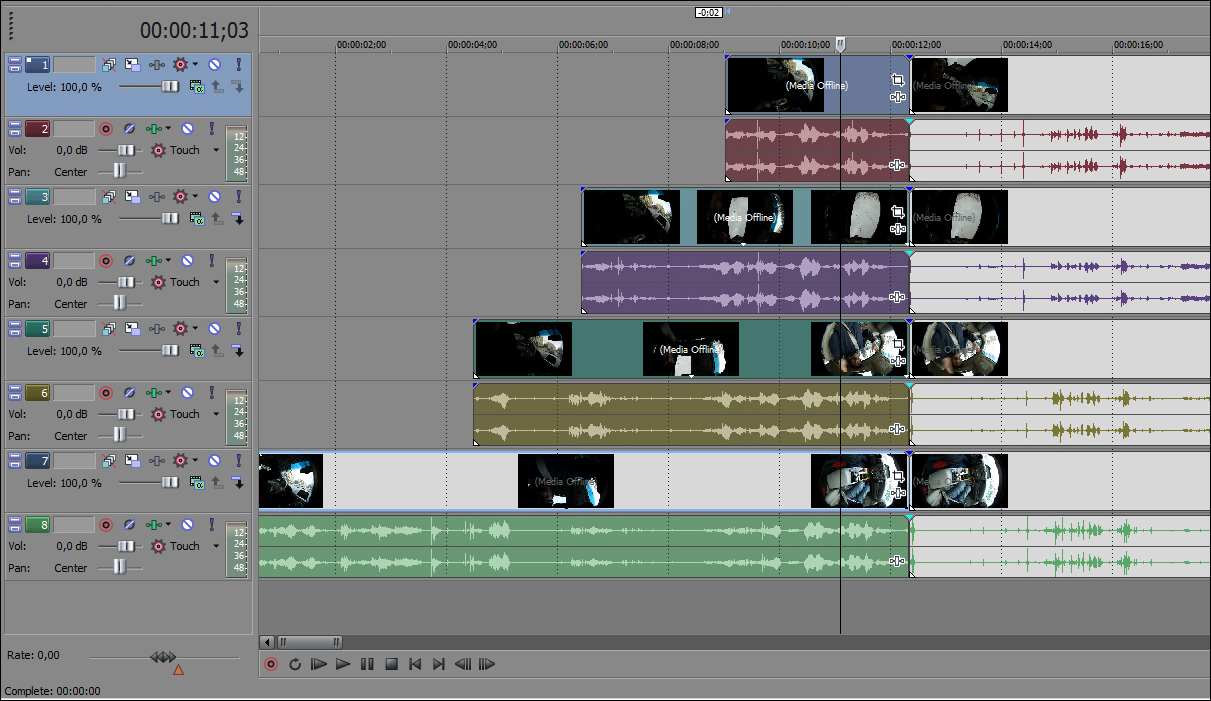
Select the start of each video and cut mercilessly. Remove all the reels to the beginning and cut the ends of the reels all together. Therefore, we have four reels of the equal length and synchronized in shooting time and exactness up to one shot.
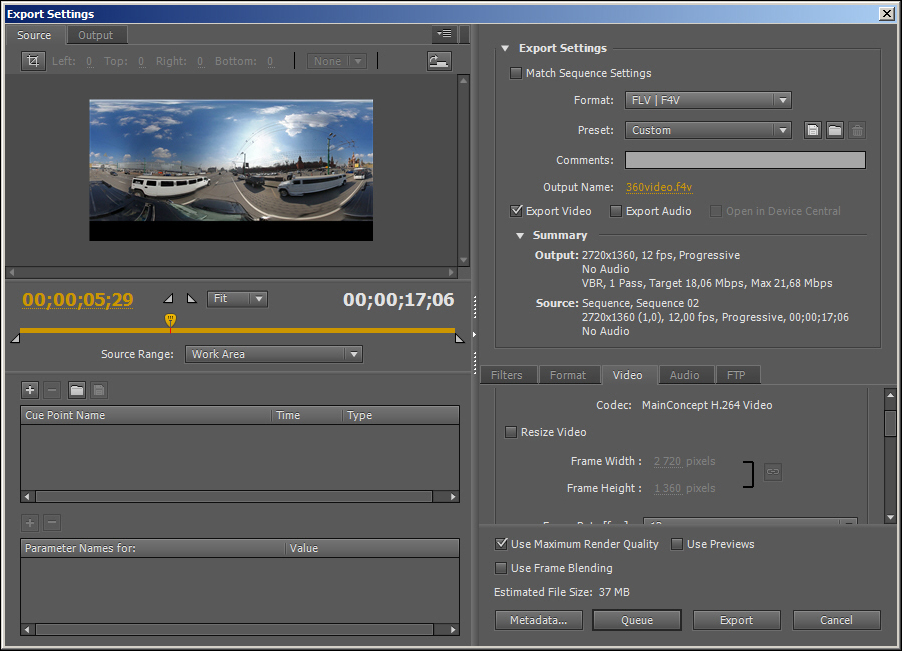
Then every reel is exported to its personal folder A, B,C,D as the independent images in JPEG format.
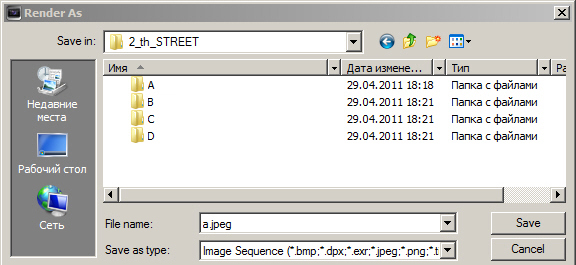
This screenshot demonstrates the export settings.
As a result of the export, we have got a sequence of the jpg-shots from each camera in each folder.
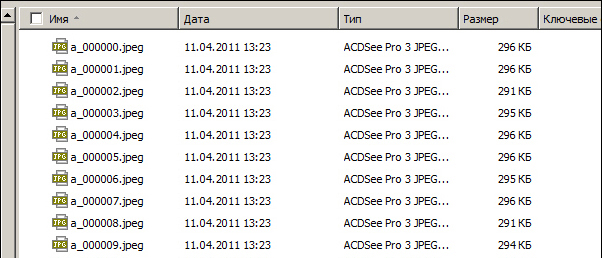
It’s easy to guess that the folders’ names and the video reels’ indexes are correspondent to the marks A, B, C, D of the cameras.
In order to decrease the resultant flow, while demonstrating the spherical video in the Internet, during the export the frequency of the shots was decrease twice to 12 shots/sec, because the shooting itself had been made with the speed of 24 shots/sec.
Sorting of Shots
Then with the help of a special self-made program written in Basic every four shots with the identical numbers were sorted into a separate folder. Finally, we had a number of the P-prefixed folders (P- panorama).
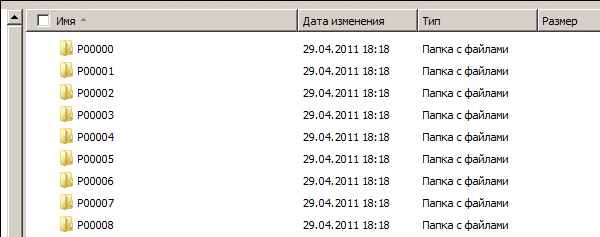
The content of each folder became as it is shown in this screenshot below:
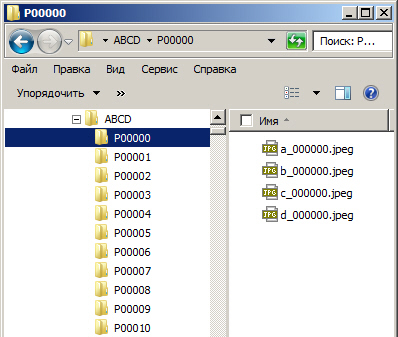
Therefore, in the folder, which quantity was equal to the quantity of the shots, we obtained the sequences of the quasisynchronized shots from which we had to make the equidistant projections (panoramas) for each shot of a future spherical video.
Stitching of Panoramas
The panoramas’ stitching was made according to the template in a batch mode using the popular program for panoramas’ stitching - PTGui PRO.
Now I would like to mention the proper functioning of the video card Asus GTX460 DIRECTCU TOP/2DI/1G using the CUDA technology. This technology allows using capacity of a video card processor in the process related to the image transformation. That led to a 3-5 times decrease in processing time of several thousand files.
So, it is a brief story on how the stitching was made.
As the cameras were firmly fixed, there was no need to stitch every panorama from the beginning. It was quite enough to make a template from the first shots and then stitch the rest panoramas according to that template. As a template for the stitching of all the panoramas 4 shots were chosen (one shot from each camera) when the car still stood motionless.
So, we stitched the panorama making the marks in the background (just to remind – there was the parallax in the foreground), optimized the panorama and the template of a project was ready.
In our situation the maximum size of the video panorama was 3088x1544 pixels. It is worth to mention that in order to encode video images the following requirement is needed to be met: the size of a shot’s side must be multiple of 16. Besides, we decided to reduce the huge video flow by 30% to be able broadcasting in the Internet. That is why the size of the resultant panorama in our template was lessened to 2720x1360 pixels.
We didn’t want to stitch several thousand panoramas manually, so, we used PTGui with its batch stitching in accordance with our template.
Leaving the project with the template opened, start Batch Builder.
(Mark 1 in the screenshot below)
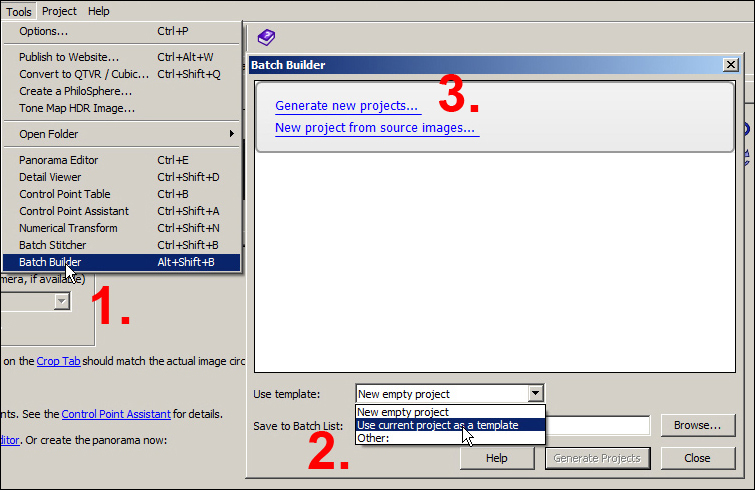
The next step: choose current opened project as a template for the building of all rest projects (Mark 2). Then begin to build the projects: «Generate new projects» (Mark 3).
The projects are built meeting the requirement: «One panorama per folder»; it is illustrated in the screenshot below:

In result, the projects for the stitching of equidistant projections will be built from each four shots of the folders P000 ............Pnnnn. After the projects have been built, Batch Builder will offer to transfer all the projects to Batch Stitcher. Press Ok and the process of equidistant projections (the panoramas themselves) begins. Depending on the capacity of your computer this process may last several hours long.
Well, now we’ve already had the equidistant projections (i.e. the panoramas themselves) stitched from four shots made simultaneously (I’d say almost simultaneously) by four cameras. At the same time, the quantity of these projections equals the number of shots in the initial video reels of each camera.
Then all the panoramas made were processed (colored) in the batch mode of Adobe Photoshop in order to make the image richer and more colorful. That moment we noticed that the available material was better in treatment of light and shade as well as it was more detailed than the reportage from Haiti.
Stitching of Video Reels
We have almost described the process of the spherical video reels’ stitching and are coming to the end. On this stage we need Adobe Premiere video editor, version CS5, not earlier. Create a project in this video editor with the settings like it is shown in the screenshot below:
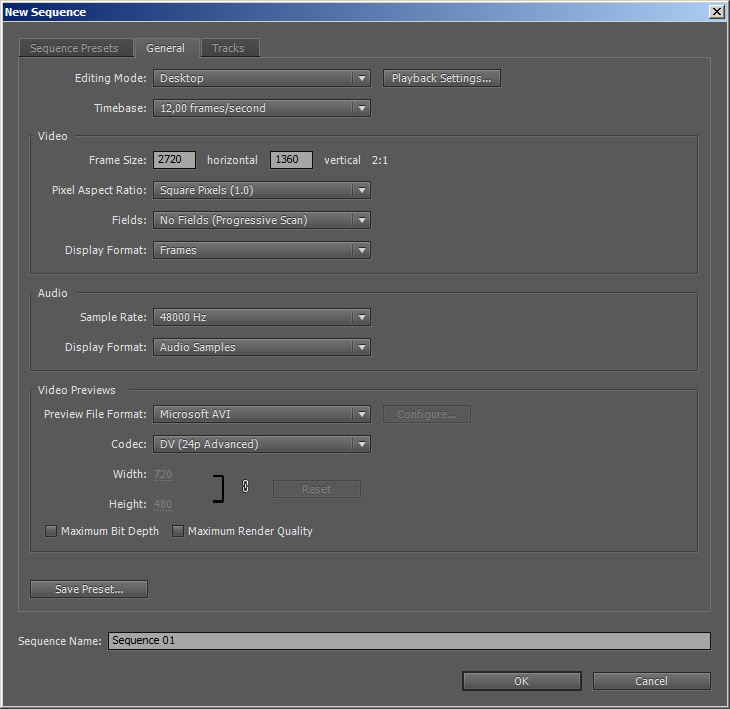
The frequency of shots is 12 shots/sec as it was during the export of the separate shots. Of course, it could be 24 shots/sec, 25 or 30 shots/sec depending on the shooting mode in the camera. But, in that case the flow of encoding video will increase twice and hardly every user will be able to view your spherical video reel. Once more I would like to stress that we create the video with the size of the shot more than Full HD 1080p but not every user can afford to view Full HD 1080p video online due to the insufficient capacity either of a channel or a server uploading the video. Surely, the decision could be a smaller shot size and, therefore, a smaller bit rate that allow the users with a low speed Internet channel viewing the spherical video online. In this case we relied on the technical progress, which is always moving ahead, and kept the shot size of 2720x1360 pixels.
In the settings of the video editor before the import of our equidistant projections it is necessary to set the duration of static image equal to one shot.
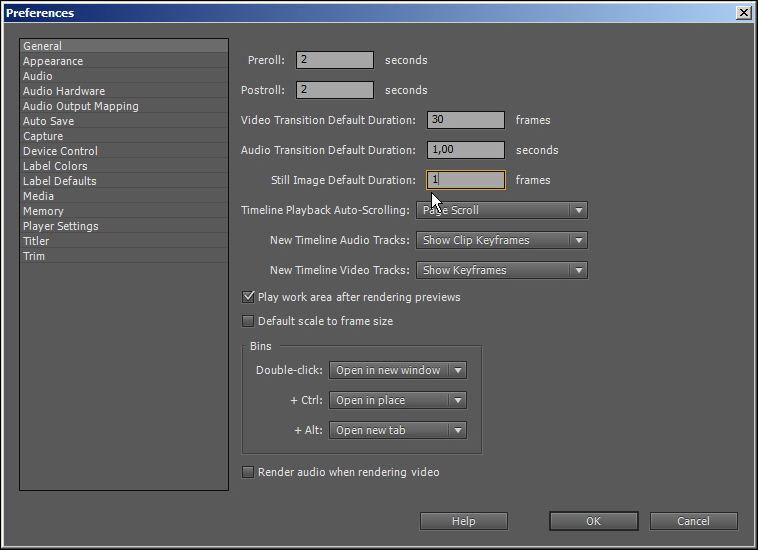
Finally, during the import of all the equidistant projections into our Adobe Premiere project an independent video shot will be formed from each independent image. The duration of the video will simultaneously be restored and will be the same as it was before the export of the separate shots from each camera.
On the timeline there are two independent pictures, which will form our reel. On this stage it is possible to add some effects in video. We used only a darkening effect in the beginning and the end of our video. Titles and other effects are better to be applied later, during the creating of a web-page using flash.
The export is made into flash container f4v, which enable encoding the video flow higher than Full HD 1080p. Naturally, we shouldn’t forget to put unusual size of our video shot in the export settings.
Depending on the capacity of your computer the import process into Adobe Premiere may take up to dozen of minutes and the encoding process of f4v video may take up to several hours.
Demonstration of 360 Video in the Internet
We had the last question: how can we show the available 360 video to the viewers? If we put it in YouTube, on the screen there will be a plain image deployed 360 degrees that is as unlike the 360 video as a sheep pasturing on a meadow is unlike well cooked kebab:
In order a viewer could see a usual picture the special player is needed, which is able to show the data-flow equidistant projections.
We used the only available for us flash player by KRPANO http://krpano.com/video/ (beta-version) with the self-made interface to demostrate the spherical video. A music is independent on the video and serves as a background sound. It means that the music doesn't stop when there is a Pause mode in the viewing of a sphere.
Having succeeded both in creation of the spherical video and adaptation of the flash player's beta-version, we faced another problem. It wasn't clear to us how to show this video to a wide range of the viewers because the resources on the server of our provider were insufficient. As soon as the number of users simultaneously opening the video became 5, our site situated in Russia on Masterhost failed and the viewers saw the following message: «Service Temporary Unavailable». It's obvious, that it was impossible to show video panoramas in such conditions and our site changed the address. We moved to the server in Germany. The equal services were severel times more expensive in Russia. Having analyzed the market, we chose precisely Germany because of the best quality-price ratio as well as due to the technical support in Russian.
However, German server didn't solved that problem completely too. The resources became more than sufficent, the simultaneous viewings' number rose up to several hundreds but the video was being demonstrated by jerks. For disgrace, despite a very good channel its capacity wasn’t enough for the proper simultaneous viewing by the great number of users. In the lowest quality the video requires the capacity of 2Mbit/sec for each user and in the high quality it is 7Mbit/sec, so, the dozens of people can overfill any channel. I’d like to remind that the information flow is higher than HD-video.
We had to use the CDN network (Content Distribution Network) in order to resolve this problem. CDN is a geografically spread network infrastructure, which allows optimizing and interchanging of the content between users in the Internet. For instance, the users from different world regions can enjoy viewing a video not from one server in Germany, for example, but from a number of servers unified in the network. Therefore, a user can obtain a content from the nearest server and that significantly accelerates the process.
Finally, we chose Amazon S3 by Amazon that is a recognized leader in storage and demostrating of the huge dimension files. In spite of US location of all the main resources, due to using CDN-technology our video reels became available for a high quality viewing not only in the USA, but also in Eurpe and Russia. It would be impossible to view the video in high and stable quality in very different world regions without CDN.
Conclusion
We understood that any man can do what another man has done and it is absolutely possible to gather the construction for 360 video shooting from the available photo equipment and there is no need to spend 63 thousand dollars for the ready decision. We made such construction using the available reflex cameras as well as we could elaborate the methods of material shooting and stitching into a real 360 video. We also could ensure the demonstration of that spherical video material in the Internet.
Due to the evident parallax in the foreground the potential of using the constructions made of reflex cameras for 360 video shooting is limited enough. However, the reflex cameras can be freely used in case when there is no need in foreground (a shooting from helicopter, for instance).
To minimize the parallax it is possible to use the small digital simple hand-held cameras.
This allows significantly minimizing the weight, size and costs of the construction along with a lower quality of an image. Unfortunately, the simple hand-held cameras don't allow setting the exposure and white balance manually for all the cameras. That is why, having resolved the problem with the parallax, sometimes we may face the problem of different brightness at different parts of our video.
In both cases (reflex and simple cameras) the problem of synchronized shooting of all the cameras won't be solved. To solve this problem it is necessary to change the electronics at a level of producers.
Nevertheless, our experiments show that at an amateur level the quite good results in 360 video shooting can be reached accompanied with low budget decisions and no need spending dozens thousand dollars for a special professional equipment.
Test Video
High Resolution360 Video, Test Shooting. High Resolution, 7Mbit/sec Flow (for fast internet only): |
|||
 |
 |
 |
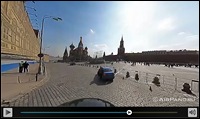 |
| Kremlin Riverfront | Vozdvizhenka, Manezhnaya Square | Okhotniy Riad, Theatre Square, Lubianka | Ilyinka, Red Square |
|
|
|||
Low Resolution360 Video, Test Shooting. Low Resolution, 2Mbit/sec Flow: |
|||
|
|
|
|
| Kremlin Riverfront | Vozdvizhenka, Manezhnaya Square | Okhotniy Riad, Theatre Square, Lubianka | Ilyinka, Red Square |
What's Next?
Undoubtedly, our test shooting is not special or artistic one but just for illustration that it is possible to create such videos with available equipment.
The producers are going ahead too. Sony released a simple video camera Sony bloggie MHS-PM5K. This camera is accompanied with a special reflex device and then it is able to shoot a 360 video but, frankly speaking, it is of low quality:
http://habrahabr.ru/blogs/gadgets/86160/
http://www.youtube.com/watch?v=LjVodf2Bnwg
iPhone 4's special device allowing to shoot a 360 video is elaborating:
http://www.iphones.ru/iNotes/131920
Besides Immersive Media there are another companies in the Internet, which produce the professional equipment for 360 video shooting.
And if a 360 video is professionally directed and edited, it can be viewed with pleasure and interest. Some of them are listed below.
The life will show whether 360 video is widespread or still exotic multimedia product…
Authors: Andrew Zubetz, Oleg Gaponyuk
10.10.2011
Discussion
You can add a comment on this page
